I. FTP all files to your web site.
II. Test all hyperlinks.
III. Phase 5 Requirements:
1. Create three domain names and search the internet and fine one that is available.
Search your names using one of the following URLS:
http://www.internic.net/whois.html
http://www.whois.net/
IV. Peer Evaluations:
Review at least 10 sites and make a redesign recommendation.
V. Google Registration:
When you register a domain name and build a Web site you can add the URL to a search engine like Google.
http://www.google.com/addurl/
MAKE CHANGES FOR NEXT WEEK
Pick a few of your received peer evaluations and redesign your site accordingly.
WHAT'S DUE NEXT WEEK:
I. Final Web site uploaded to the web account
II. DVD-R or CD-R with the web site and a folder containing all production files ( .psd, .fla, .mov, .ai, .wav, .mp3, .pdf, etc...)
III. Presentation of Web site
IV. Design Rationale explaining the design decisions (typography, colours, shapes, animations, metaphor, spacing, economy, repetition, balance, focal point,unity)
V. All 5 Phases (pdf) documents on DVD/CD.
Wednesday, December 9, 2009
Thursday, November 26, 2009
Week #13: Web Page Form Design

Examples of form designs:
http://www.tumblr.com/register
Tumblr uses big form fields and a nice clean appearance.
http://www.newspond.com/register/
News Pond gets users to focus on their sign-up form with the use of a background glow.
http://graphik.fi/contact/
Graphik uses a big friendly header on their contact form.
_______________________________________________________
Web forms don’t have to be boring and, using CSS or Flash, you can easily make sure that they are appealing and effective. To get noticed, you need to come up with something unique and interesting — symbols, icons, colors, position or the size of web form are often used to achieve interesting design solutions.
• http://www.smashingmagazine.com/2006/11/11/css-based-forms-modern-solutions/
• http://www.smashingmagazine.com/2008/04/17/web-form-design-modern-solutions-and-creative-ideas/
• http://www.alistapart.com/articles/prettyaccessibleforms
• http://designshack.co.uk/tutorials/10-css-form-examples
• http://www.1stwebdesigner.com/inspiration/77-inspiring-blog-comment-form-designs-good-examples/
Friday, November 20, 2009
Week #12: Pop Up Windows
This week we will design a web page that hyperlinks to a series of html files holding: a picture, a QT video, and an mp3 audio file. A new browser window will open when each hyperlink is clicked.
STEP #1: Create the resources and resource html files
Be sure to wrap each page:
relative
100%
100%
text-align: center
margins: 0, auto, 0, auto
-------------------
• PICTURE.html
• VIDEO.html
Insert > Plugin
Set the width and height properties for the video to 480 x 336 ( 320 + 16)
Modify > Page Properties, set margins to 0,0,0,0
In the HTML you can set autostart="false" to stop the video from playing automatically on opening the browser window.
• AUDIO.html
TIP: Use GarageBand to create an audio file for use in this exercise.
Insert > Plugin
Set the width and height properties for the audio to 300 x 16
Modify > Page Properties, set margins to 0,0,0,0
In the HTML you can set autostart="false" to stop the audio from playing automatically on opening the browser window.
------------------------------------
In DREAMWEAVER
1. When hyperlinking each item, be sure to add a # in the link field of the Properties for each hyperlink
2. Assign a behavior: Open Browser Window
URL to display: picture.html
Width: 200
height: 200
Name: picture
OK
CODE changes
Change to default script to now read the following:
function MM_openBrWindow(theURL,winName,features) { //v2.0
what = window.open(theURL,winName,features);
}
function MM_closeBrWindow() { //v2.0
what.window.close();
}
Also add the script to the close link:
a href="#" onClick="MM_closeBrWindow()">Close Window
Friday, November 13, 2009
Week #11: Frameset
Basic terminology:
A frameset is a container for frames.
A frame is a container for an html page.
Why Framesets?
This allows content to flow through a web site, while certain areas or frames remain on the screen all the time, other areas are dynamic.
Typically a three-frame-frameset would hold the following content 1) the top frame HEADER or Flash Banner, 2) the side frame nav bar, and 3) the mainFrame content area. When an item is clicked on the nav bar, the content would be played in the content area of the page.
Our basic example has two frames in the Frameset.
• The Frameset file will be saved as myFrameset.html.
• The topFrame (topFrame.html) will hold the Menu and the hyperlinks
• Page1.html, Page2.html, and Page3.html will play in the mainFrame (bottomFrame.html).
Here's an example of what we will do this week:
Part 1 HOW TO:
Part 2 HOW TO:
Sunday, November 8, 2009
Week #10: Drop Down Menu
This week we will use the SPRY DROP DOWN MENU option and create a horizontal drop down menu.
Thursday, November 5, 2009
Week #9: Exercise
Create three animations
1) Photoshop : using frames
2) Photoshop : using the timeline
3) Flash: using Actionscript 2.0, with a hyperlink to the menu.html
1) Photoshop : using frames
2) Photoshop : using the timeline
3) Flash: using Actionscript 2.0, with a hyperlink to the menu.html
Week #9: Create a SWF Animation Using Flash
In this example, Flash is used to create an animation with a hyperlink to menu.html
Wednesday, November 4, 2009
Script for hyperlinking a button to a URL
FLASH, Actionscript 2.0
on (release) {
getURL("menu.html", "blank");
}
on (release) {
getURL("menu.html", "blank");
}
Friday, October 30, 2009
CS4-Photoshop: Animated Gif Example
This animated gif file is created in CS4-Photoshop using the Animation Timeline.
Layer opacity and style is animated over 10 seconds.
The file was then exported from Photoshop as a Quicktime video.
Animation:
Window > Animation
1) Click the stopwatch beside the property to insert an initial keyframe.
2) Move the CTI ( Current Time Indicator) to a new time in the timeline and adjust the property settings.
A new keyframe is automatically created at that place in time.
NOTE: You will need at least two keyframes to create an animation.
When you are finished designing your animation, Save for Web
1) Choose GIF
NOTE: Press the play button to play your animation.
2) Save as HTML & images
Photoshop now renders out the animation and the HTML and gif files.
Thursday, October 29, 2009
The Promise of Music is to love and to serve.
The power of the web to animate the universal love in all of us.
Friday, October 16, 2009

Thursday, October 15, 2009
Wednesday, October 14, 2009
Week #6: REVIEW EXAM EXERCISE
This exercise will help you prepare for the MID-TERM EXAM next week, where you will have to build a web site.
This week, the challenge is to create a web site in 50 minutes.
Here is what you will build and post to your site this week:
1) The Root folder will have a folder inside named "ReviewExam".
2) The "ReviewExam" folder will hold the following:
• index.html
• ReviewMenu.html
• trivia1.html
• trivia2.html
• contact.html
images folder ( holding all the slices and pictures)
3) index.html will be the site "splash" page. It will have a link to the ReviewMenu.html and a © message.
4) ReviewMenu.html will be a menu created in Photoshop with UP and OVER (slices) states for the following four menu items: trivia 1, trivia 2, contact, main menu. The "main menu" hyperlink will link to the menu.html page for the course. Name all menu slices, and the header slice. Save the .psd file in the images folder.
5) trivia1.html will contain a picture of an artist/songwriter and a line of text trivia about them. Use an apDiv to hold the picture and text. Have a Hyperlink back to the ReviewMenu.html. Use a class to format the text.
6) trivia2.html will contain a picture of an artist/songwriter and a line of text trivia about them. Use an apDiv to hold the picture and text. Have a Hyperlink back to the ReviewMenu.html.
7) contact.html will contain your name and email link to your address. Also place a picture of yourself at 1000 pixels from the top, with an anchor. Have a hyperlink to the anchor. The picture will also be a hyperlink back to the top of the page. Have a Hyperlink back to the ReviewMenu.html.
IMPORTANT PAGES NOTE:
• ALL pages must contain a wrapper set to 760 width.
• Upload all the files to the Site and hyperlink Week#6 on the menu to the index.html inside the "ReviewExam" folder
• Each page will have a background colour or gradient fill or image (repeat)
• Each page will have a HEADER and a CSS class to format the page header
• Each page will have the © character
UPLOAD:
TIPS:
In Dreamweaver, Use "Save As" when appropriate
REMEMBER YOU HAVE 50 MINUTES TO COMPLETE THE REVIEW EXAM.
HAVE FUN and GOOD LUCK!!!!
Friday, October 9, 2009
HOW TO: Table, Ext. CSS, class...
no audio on this one...
Here's what's included:
• change background color
• add two rows to the table
• add text to a row
• create an external CSS file
• create and define a CSS "class"
• apply a CSS "class" to selected text
• create a content image in Photoshop and save for web
• change a SRC image in Dreamweaver
• Hyperlink menu items to html pages
• use "Save as" to create multiple files
HOW TO: Slice & Divide
Items covered in the video:
• Slicing from guides, and
• dividing slices evenly vertically across.
• Naming slices. The name becomes the filename for the sliced image.
• Saving for HTML and images
• Saving only images
• Saving background images
• PNG-24 file format. Use this for transparency.
• Slicing from guides, and
• dividing slices evenly vertically across.
• Naming slices. The name becomes the filename for the sliced image.
• Saving for HTML and images
• Saving only images
• Saving background images
• PNG-24 file format. Use this for transparency.
Thursday, October 8, 2009
File Formats for Web: JPEG, PNG-24, GIF, PNG-8
You can choose between four formats for the web. Use the following guidelines when choosing the format for your web image:
JPEG In most cases, this is the best format in which to save photographs.
PNG‑24 Like JPEG, this is a good format for photographs. Choose PNG‑24 rather than JPEG only when your image contains transparency. (JPEG does not support transparency; you must fill it with a matte color.) PNG‑24 files are often much larger than JPEG files of the same image.
GIF is the format to use for line art, illustrations with large areas of solid color and crisp detail, and text. Also, if you want to export an animated image, you must use GIF.
PNG‑8 is a lesser-known alternative to GIF. Use it for the same purposes (except animation).
Images in GIF and PNG‑8 formats, sometimes called indexed-color images, can display up to 256 colors. To convert an image to indexed-color format, Photoshop Elements builds a color lookup table. If a color in the original image does not appear in the color lookup table, the application either chooses the closest color in the table or simulates the color using a combination of available colors.
JPEG and PNG‑24 files support 24‑bit color, so they can display up to 16 million colors. Depending on the format, you can specify image quality, background transparency or matting, color display, and the method a browser should use to display the image while downloading.
The appearance of an image on the web also depends on the colors displayed by the computer platform, operating system, monitor, and browser. You may want to preview images in different browsers and on different platforms to see how they will appear on the web.
Reference:
http://help.adobe.com/en_US/PhotoshopElements/8.0/Win/Using/WSCB4EC73C-17F4-4c4d-887D-2E6712FE6E80_WIN.html
PNG or GIF?
TRANSPARENCY NOTE:
GIF and PNG‑8 formats support one level of transparency—pixels can be fully transparent or fully opaque, but not partially transparent.
PNG‑24 format supports multilevel transparency; that is, you can have up to 256 degrees of transparency in an image, ranging from opaque to completely transparent.
FILE FORMATS:
• GIF (stands for Graphics Interchange Format) was developed in the late 1980's and it is still widely used.
• PNG (Portable Network Graphics) was developed around 1995, became a W3C recommendation in 1996, and has been widely implemented in most Web browsers as soon as 1998.
THE PNG ADVANTAGE:
For the Web, PNG really has three main advantages over GIF:
• alpha channels (variable transparency),
• cross-platform gamma correction (control of image brightness) and color correction
• two-dimensional interlacing (a method of progressive display).
PNG also compresses better than GIF in almost every case (5% to 25% in typical cases).
REFERENCES:
http://help.adobe.com/en_US/PhotoshopElements/8.0/Win/Using/WS3089C783-49BC-49c2-910A-D81A858CA3F0_WIN.html
http://www.w3.org/QA/Tips/png-gif
Week#5: IN-CLASS EXERCISE (5%)
Requirements:
Create a six page web site (splash page & five content pages) featuring five of your design works from the past three semesters.
• Each page will have a Nav Bar menu created in Photoshop using guides, slices, and the "divide slice vertically" option. Save the psd on your site.
• Each page will have a gradient fill tiled background image. Save the psd on your site.
• Each page will be linked to an external CSS document, used to format the following description and explanation.
• Each of the five content pages will present one design work, with a description of the design process, tools used and techniques employed in creating the work.
• Explain how each work relates to one of my strengths.
• An opening splash page for the six page site will read: "View Design Portfolio: Examples of Recent Work by YOUR NAME GOES HERE"
• titles for all pages
• meta tags for all pages
• © for all pages
Due date and time is Tuesday October 13, 12:00pm.
Friday, October 2, 2009
Week#4: IN-CLASS EXERCISE (5%)
Week#4: IN-CLASS EXERCISE (5%)
This week we explored creating a site map, image gallery using anchors, and a contact page with a mailto.
For full marks, your week04 site should have the following features:
• site map: links to every page on your site
• CSS .class to format the site map page
• contact information page: including a mailto
• copyright (special character) notice
• image gallery: with three anchored images
• image gallery: images hyperlinked to the #top anchor
• titles on all pages
• week 04 link from the main menu (menu.html) to all three pages
EXAMPLE:
http://www.designportfolio.ca/~graf2024_002/menu.html
Anchors
The image gallery is created with anchors and layers (with an image inside each of them).
Each image is placed in an apDiv that is set to positioning absolute.
This apDiv is placed within the wrapper apDIv1.

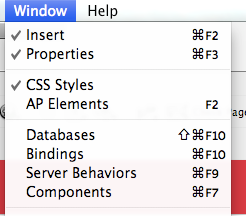
From the Window Menu, select the INSERT panel.
To insert an anchor, place the cursor on the page, and select anchor form the Common tab menu.

Placing anchors HOW TO video:
Each image is placed in an apDiv that is set to positioning absolute.
This apDiv is placed within the wrapper apDIv1.

From the Window Menu, select the INSERT panel.
To insert an anchor, place the cursor on the page, and select anchor form the Common tab menu.

Placing anchors HOW TO video:
Monday, September 28, 2009
Week #4: Site Map, Mailto, and Image Gallery (using anchors)
For example:
http://www.designportfolio.ca/~graf2024_001/index.html
What's required this week:
• week04.html link on the menu page
• image gallery using anchors
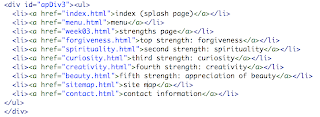
• site map page (sitemap.html)
A site map contains a link to every page in your site.
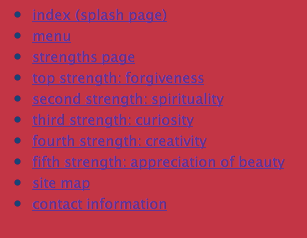
The text is placed in an apDIv, and formatted using an unordered list.
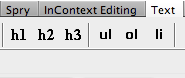
Open the INSERT menu and click the Text tab to reveal the text format items
• contact page (contact.html) This will have a mailto: Myemail@email.com link

Select the email option under the Common Tab, in the INSERT menu:
• Copyright notice using the special character © represented by "©"
Also note that there are hard returns and soft returns:
SHIFT & ENTER/RETURN is a line break or soft return "br"
ENTER/RETURN is a paragraph or hard return "p"

• Be sure the titles of each page have both your name and the title of the content for that page.
Be well.
See you next time.
http://www.designportfolio.ca/~graf2024_001/index.html
What's required this week:
• week04.html link on the menu page
• image gallery using anchors
• site map page (sitemap.html)
A site map contains a link to every page in your site.

The text is placed in an apDIv, and formatted using an unordered list.
Open the INSERT menu and click the Text tab to reveal the text format items


• contact page (contact.html) This will have a mailto: Myemail@email.com link

Select the email option under the Common Tab, in the INSERT menu:

• Copyright notice using the special character © represented by "©"
Also note that there are hard returns and soft returns:
SHIFT & ENTER/RETURN is a line break or soft return "br"

ENTER/RETURN is a paragraph or hard return "p"

• Be sure the titles of each page have both your name and the title of the content for that page.
Be well.
See you next time.
Friday, September 25, 2009
Week#3: IN-CLASS EXERCISE (5%)
This week we explored transforming text slices created in PHOTOSHOP, into rollovers in DREAMWEAVER.
We also hyperlinked the text slices to go to content pages.
For full marks, your week03 site should have the following features:
• slices for UP (white) and OVER (coloured)
• Six pages (nav bar, five content pages)
• Nav Bar Behaviors for each text menu item, with Rollovers AND Hyperlinks (between the Nav Bar and the content pages)
• meta tags including a title, description, and keywords for each page
• apDiv wrapper for each page
• content pages contain strength descriptions
EXAMPLE:
http://www.designportfolio.ca/~graf2024_001/
Be sure to link week03.html to your menu.html.
Thursday, September 24, 2009
Friday, September 18, 2009
Week #3: Slicing & Creation of a Nav Bar
Click on the link to see an example of what we will design this week:
http://www.designportfolio.ca/~graf2024_001/week03.html
NOTE: www.designportfolio.ca SERVER WILL BE DOWN
Friday Sept 18 6:00pm until Monday Sept 21 8:00am.
"How To" videos will arrive over the weekend, on my YouTube Site and through this Blog.
What you might like to do, is prepare an interface in Photoshop to bring to class this coming week.

transforms to:

the hyperlinked page for "Curiosity":

Thursday, September 17, 2009
SERVERS DOWN THIS WEEKEND
Just in case you are planning to get & put files to your account this weekend,
the servers will be non-functional Friday Sept 18 at 6pm until Monday Sept 21 at 8am.
the servers will be non-functional Friday Sept 18 at 6pm until Monday Sept 21 at 8am.
Wednesday, September 16, 2009
THREE PAGE WEB SITE How To
Create a three page web site.
Page 1: Splash page (index.html) containing designer's name, picture, title, and hyperlink to menu.html
Page 2: Menu (menu.html), linking each weekly exercise in the course. Link to week01 (week01.html) and week02 (index.html)
Page 3: week01.html
For example:
http://www.designportfolio.ca/~graf2024_005/
A "How To" video tutorial:
Please note that meta tags are not illustrated in the video.
Saturday, September 12, 2009
WEEK#2: IN-CLASS EXERCISE (5%)
Create a three page web site linking index.html, menu.html, and week01.html.
See example: http://www.designportfolio.ca/~graf2024_005/
The Web site must include the following:
• Page wrapper (APDiv with CSS);
• Meta tags for each page: Page Title (your name), and Description (one sentence), keywords (your top five strengths)
• 3 pages (SPLASH, MENU, WEEK01)
SPLASH: (index.html) This is the site splash page with your picture, name, title, and hyperlink to menu.html.
MENU: (menu.html) includes text for 15 weeks. Include also a hyperlink to week01.html and week02 (hint: index.html)
WEEK01: This is last week's index.html page renamed to week01.html
• Titles for each page
• CSS Class created and applied to strengths on week01 page.
WRAPPER How To video
A wrapper is a container, constructed with CSS, to hold the web page content.
WRAPPER:
(4:00)
WRAPPER:
(4:00)
Week#2: Wrapper, Meta tags...
This week we will construct a basic three page site featuring the following:
• Page wrapper (APDiv with CSS);
• Meta tags: name, description (one sentence), keywords (top five strengths)
• index.html (this is the site splash page) with picture and hyperlink to menu.html.
• menu.html will include a hyperlink to week01.html
• week01.html is last week's index.html page renamed.
WRAPPER:
(4:00)
IN-CLASS EXERCISE (5%)
Create a three page web site linking index, menu, and week01.
See example: http://www.designportfolio.ca/~graf2024_002/
• Page wrapper (APDiv with CSS);
• Meta tags: name, description (one sentence), keywords (top five strengths)
• index.html (this is the site splash page) with your picture and hyperlink to menu.html.
• menu.html will include all text for 15 weeks. Include a hyperlink to week01.html
• week01.html is last week's index.html page renamed.
• Page wrapper (APDiv with CSS);
• Meta tags: name, description (one sentence), keywords (top five strengths)
• index.html (this is the site splash page) with picture and hyperlink to menu.html.
• menu.html will include a hyperlink to week01.html
• week01.html is last week's index.html page renamed.
WRAPPER:
(4:00)
IN-CLASS EXERCISE (5%)
Create a three page web site linking index, menu, and week01.
See example: http://www.designportfolio.ca/~graf2024_002/
• Page wrapper (APDiv with CSS);
• Meta tags: name, description (one sentence), keywords (top five strengths)
• index.html (this is the site splash page) with your picture and hyperlink to menu.html.
• menu.html will include all text for 15 weeks. Include a hyperlink to week01.html
• week01.html is last week's index.html page renamed.
SITE DEFINITION How To Video
SITE DEFINITION How To Video,
including Get from remote server and Put files to the server:
(7:35)
including Get from remote server and Put files to the server:
(7:35)
Friday, September 11, 2009
WEEK#1: IN-CLASS EXERCISE (5%)
Week#1: Strengths, Picture, Name
See example: http://www.designportfolio.ca/~graf2024_001/
• Get the existing Web page (index.html and images folder) from your Web account
• Change the title tag to your name
• Change the Header to your name
• Add your picture to the Web page
• Add your five top strengths to the Web page
• Save the work
• Put the index.html and dependent files to the Web account by the end of the class session.
Wednesday, September 9, 2009
Week #1: Intro to Web
The plan for this week:
1. Video
Watch Kevin Kelly video... on the web.
2. Strengths Questionnaire
This questionnaire will find your 24 character strengths. We will use the top five for the WEB SITE PROJECT.
Fill out VIA Signature Strengths Questionnaire.
VIA Signature Strengths Questionnaire
 STEPS: Register by filling out a short form, then select VIA Signature Strengths Questionnaire on the site under the heading Engagement Questionnaires:
3. Root Folder
Set up a root folder to hold all the project files. Inside this folder, there will be a folder named "images" to hold the image files (jpg, gif, png).
4. Site Definition
With a Web account number, set up a new site definition using Dreamweaver.
5. Web Page
Create a basic web page, with text and a picture. Upload the page to the Web account.
----------------------------------------------------
WEEK#1: IN-CLASS EXERCISE (5%)
See example: http://www.designportfolio.ca/~graf2024_001/
• Get the existing Web page (index.html and images folder) from your Web account
• Change the title tag to your name
• Change the Header to your name
• Add your picture to the Web page
• Add your five top strengths to the Web page
• Save the work
• Put the index.html and dependent files to the Web account
----------------------------------------------------
HOMEWORK:
• Bring a picture of self (jpeg file) to use in week 02 class exercise.
• Bring top 5 questionnaire strengths and examples of each, from your own life experiences.
• Start gathering portfolio pieces for use in the Web Site Project. Try and locate 10 pieces to include.
• Make notes and know how to set up root folder and site definition using Dreamweaver.
• Eat healthy, get lots of sleep, and start the project today!
Welcome Back!!!
http://www.designportfolio.ca/~graf2024_001/
This week we will learn how to set up a root folder, set up a Site definition, and create a basic web page.
This week we will learn how to set up a root folder, set up a Site definition, and create a basic web page.
Wednesday, July 22, 2009
Web Principles
1. Inter-connectivity
2. Inter-dependency
3. Inter-relationship
We are all together now.
Think about this... and how might you behave knowing this.
2. Inter-dependency
3. Inter-relationship
We are all together now.
Think about this... and how might you behave knowing this.
Thinking 'bout dreamweaving...
I was thinking about the Web today...
seems that it's all about video and music sharing... and facebook... and other twitterings...
maybe we should all get Blackberries and hang out in cafe's... and send each other cool stuff...
OR we could try and change the world.
You choose.
another summer musing...
seems that it's all about video and music sharing... and facebook... and other twitterings...
maybe we should all get Blackberries and hang out in cafe's... and send each other cool stuff...
OR we could try and change the world.
You choose.
another summer musing...
Monday, January 5, 2009
Flash anyone?
Check out http://www.graf2028.blogspot.com if you want to learn some Flash this Winter. Course starts up week of January 5, 2009.
Subscribe to:
Posts (Atom)
